
[!NOTE] This project is my capstone work at Bangkit Academy. It integrates front-end and back-end development with a machine learning model to create a seamless and intelligent application.
Table of Contents
Background
The EdTech Market
The global EdTech market is expected to reach USD 810.3 billion by 2033, up from USD 220.5 billion in 2023, growing at a CAGR of 13.9% from 2024 to 2033. Educational Technology (EdTech) integrates technology into education to improve learning outcomes. Using tools such as virtual classrooms, interactive learning apps, and AI-driven adaptive technologies, EdTech fosters personalized and engaging educational experiences.
The EdTech market encompasses the sale and distribution of technology-based educational solutions. It has seen substantial growth over the past decade, propelled by increasing adoption in both traditional and non-traditional educational institutions.

Global EdTech Market Size, Share, Statistics Analysis Report by market.us
The expansion of the EdTech market can be attributed to several key factors. Firstly, there is a growing demand for personalized learning solutions that cater to individual learning styles and paces. Additionally, technological advancements and increased access to high-speed internet have made EdTech tools more accessible. The rising acceptance of digital learning and the global push towards building digital literacy skills from a young age also significantly contribute to the market’s growth.
Challenges in Indonesia’s Education Landscape
As the world’s 15th largest country, Indonesia faces significant inequality in education access between urban and rural areas. Urban schools often have modern facilities, while rural schools frequently lack basic resources like proper classrooms, textbooks, and teaching aids. This disparity leads to lower education quality in rural areas compared to urban centers.
In response to the shift from traditional offline education to online platforms, my platform aims to bridge this gap. By connecting students with qualified teachers nationwide, we offer a personalized and flexible learning experience tailored to individual needs, addressing the core problems of limited access and diverse learning requirements.
P2P Solutions
My platform facilitates a peer-to-peer learning environment, connecting students with qualified teachers across Indonesia. Students can choose subjects and instructors based on their needs, ensuring a personalized educational journey. Key features include:
- Rigorous Teacher Selection Process: A strict screening process ensures only the most qualified educators join the platform.
- Separation of Teaching and Assessment: By separating teaching from evaluation, we ensure unbiased assessments.
- Advanced Semester-Based Testing: Tailored, high-standard exams are introduced for each course at the end of every semester.
Innovative approaches to peer-to-peer learning in EdTech include:
Social Annotation
Social annotation is a feature that allows students to annotate digital texts, such as articles, ebooks, or PDFs, with comments, questions, or insights. They can also view and respond to other students’ annotations, creating a dynamic and interactive reading experience. EdTech software can use social annotation to foster critical thinking, comprehension, and discussion among students, as well as to provide feedback and guidance from teachers. Social annotation can also help students develop digital literacy and research skills.
Peer Assessment
Peer assessment is a process that enables students to evaluate and provide feedback on each other’s work, such as assignments, projects, or portfolios. It can help students improve their self-regulation, metacognition, and communication skills, as well as to learn from different perspectives and approaches. EdTech software can use peer assessment to enhance the quality and quantity of feedback, to reduce the workload and bias of teachers, and to increase the motivation and accountability of students.
Collaborative learning
Collaborative learning is a mode of instruction that involves students working together in small groups to achieve a common goal, such as solving a problem, completing a task, or creating a product. It can help students develop social, cognitive, and emotional skills, as well as to deepen their understanding and retention of the content.
AI Features
Student Feedback Sentiment
Improving teachers performance with real time student feedback for every course on the platform.
- Real-Time Feedback: Enables students to provide real-time feedback for every course.
- Performance Improvement: Helps lecturers enhance their performance based on student sentiment.
AI Student Analyzer
Provide insights from student feedback and can get improvement recommendations to helps teachers can adapt their teaching style to better align with student needs.
- Insights from Student Feedback: AI identifies key areas where lecturers can improve by analyzing student sentiment, addressing common challenges such as understanding and meeting student needs.
- Improvement Recommendations: AI provides actionable suggestions to help lecturers refine their teaching methods and align better with student expectations.
Tools and Technology
Tech Stack
- Programming Language: Python
- IDE: Lightning.AI for running large models, VS Code for app development
- Design: Figma
- Front-End & Back-End: Flet Python
- Libraries: TensorFlow, Transformers (BERT Model)
- API: Gemini Flash 1.5
Dataset
The dataset used for this project is “Student Feedback,” provided by Jayaprakashpondy on Kaggle. It contains the following columns:
- id: Unique identifier
- comment: Feedback from students
- quality: Sentiment labels divided into five classes: Awesome, Good, Average, Poor, and Awful
The dataset is accessible via this link.
Design
Before starting to develop the app, the initial step was to create an overview of the app’s flow through UI/UX design. I have designed the main prototype in Figma to visualize how users will interact with the application. You can access the design prototype via this link.

Cover Design EdTech App. Image by Author
For this project, I focused on developing the main features and primary pages of the app. Creating the entire application would require significant time. Therefore, this project version includes the fundamental functionalities rather than 100% of the intended features.
Machine Learning
Problem Definition
The goal of this project is to analyze student feedback from courses and classify it into five sentiment categories: Awesome, Good, Average, Poor, and Awful.
For the Student Feedback Sentiment feature
Instead of requiring students to label their feedback manually, a machine learning model is implemented to automatically determine the sentiment in real-time based on a single input. This approach simplifies the feedback process, saving students time and effort by removing the need for detailed explanations.
For the AI Student Analyzer feature
With numerous feedback comments from students, it can be challenging for teachers to review and understand all feedback individually. This AI-powered tool analyzes student feedback and identifies key insights about their needs. It provides actionable recommendations, helping teachers improve their teaching methods and align them with student expectations more efficiently.
The solution
After defining the problem, we need a way to solve it. This project uses NLP techniques to transform the dataset from text to numerical data, making it suitable for machine learning models. I tested different models, and the BERT model stood out for its exceptional performance and versatility.
BERT (Bidirectional Encoder Representations from Transformers) is a deep learning-based NLP model capable of capturing complex semantic relationships through multi-headed attention and bidirectional training. It can also be fine-tuned for specific tasks like sentiment analysis.
As I mentioned before, our dataset has 5 classes, and the goal is to predict which class is correct based on student feedback. So in this case, we are using multiclass classification. In the field of machine learning, classification is a fundamental task where data is categorized into predefined classes or labels based on specific features.

Differences between Binary, Multiclass and Multi-label Classification. Image by Harshwardhan
There are three main types of classification problems:
-
Binary Classification: Predicts one of two classes (e.g., cat or dog).
-
Multiclass Classification: Predicts one of several predefined classes (e.g., categorizing emails as spam, ham, or important).
-
Multilabel Classification: Predicts multiple possible labels for a single input (e.g., tagging a document with multiple topics).
So here I use the BERT model, because BERT is generally considered a very good choice for multi-class text classification tasks due to its powerful language understanding capabilities, ability to capture complex semantic relationships within text, and adaptability to different classification problems through fine-tuning. This makes it a highly effective option for classifying text into multiple categories.
Based on the article Choosing the Best Approach for Multi-Class Text Classification: A Comprehensive Guide, four prominent approaches for multi-class text classification are compared based on scalability, cost, performance, and accuracy. These methods include:
- Text Embeddings with Cosine Similarity
- GPT Models with Few-Shot Prompting
- Fine-Tuning GPT Models
- Fine-Tuning BERT or Sentence Transformer Models
Comparison Table:

Comparison Methods for Multi-Class Text Classification. Image by Karthikeyan
So, for high accuracy and domain-specific tasks with low cost, I use Fine-Tuning BERT or Sentence Transformers when I have labeled data and need a high degree of accuracy.
BERT Model Structure
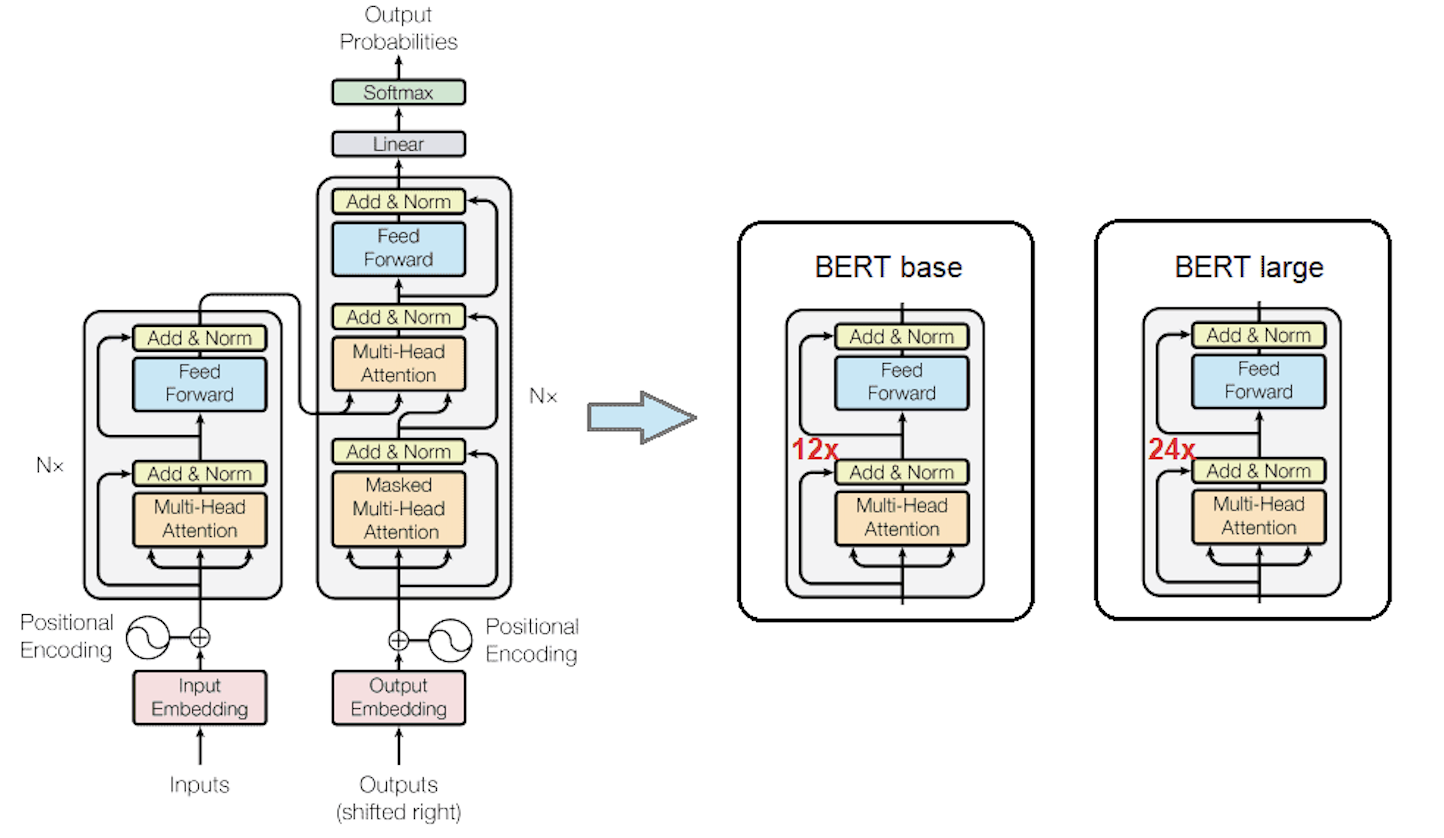
BERT’s architecture consists of multiple Transformer encoder layers. Image by Sushant
BERT is based on the Transformer architecture, specifically the encoder part. Here are the key components:
- Input Embeddings:
-
Token Embeddings: Represent words or subwords in the input text. BERT uses a WordPiece tokenizer to handle out-of-vocabulary tokens.
-
Segment Embeddings: Indicate whether tokens belong to the first or second sentence (used in tasks like sentence pair classification).
-
Position Embeddings: Capture the position of each token to understand the order of words.
- Transformer Encoder Layers:
-
BERT-Base: 12 layers (encoders), 768 hidden units per layer, 12 attention heads.
-
BERT-Large: 24 layers (encoders), 1024 hidden units per layer, 16 attention heads.
Both BERT-Base and BERT-Large has Cased and Uncased versions. BERT Uncased where the text has been lowercased before WordPiece tokenization. e.g., “James Bond” becomes “james bond”. It also removes accent markers. BERT-Cased where the true case and accent markers are preserved.
Each encoder layer has two main components:
-
Self-Attention Mechanism: Helps the model focus on relevant words in the text.
-
Feed-Forward Neural Network: Processes the output of the attention mechanism.
- Output Layer: The final encoder output goes to a classification head (a simple neural network) to predict the sentiment class.
When to Use BERT Uncased
BERT Uncased is ideal when the text doesn’t rely on capitalization, like informal social media posts or chats. Changing capitalization doesn’t affect the meaning. For instance, “Apple” and “apple” are treated the same when referring to the fruit.
When to Use BERT Cased
BERT Cased should be used when capitalization matters, such as with names, brands, or places. For example, “Apple” as a company versus “apple” as a fruit. It’s also more suitable for formal text, like academic writing or official documents.
In this project, I analyze student feedback about courses and teachers, which is usually more formal compared to social media comments. Students tend to write in structured sentences, especially when mentioning course names or teachers’ names. For example, “The Data Science material is very clear” or “Mr. Andi’s teaching is very interesting.” Capitalization helps the model recognize these names or important terms correctly. Additionally, students sometimes use all-uppercase words for emphasis, like “TEACHING Mr. / Mrs.” BERT Cased preserves this capitalization, allowing it to understand subtle sentiments better.
Since the feedback is formal and capitalization matters, BERT Cased is the best choice for analyzing sentiment in this context.
Preprocessing
First of all, it is important to know that BERT incorporates pre-processing methods that are used automatically, but it’s still important to clean and prepare the data properly.
df1 = pd.read_csv('dataset_translated.csv', encoding='latin1')
df1.head()
Id	comment	quality
0	45881	Rand was a good guy, really... he was. But I f...	awful
1	45881	He is brilliant in his field, but expects his ...	poor
2	45881	He has a major in philosophy which is why all ...	awful
3	45881	I thought his class was extremely hard but des...	good
4	45881	I recently just finished taking Comp 110 with ...	poor
As we can see our data set label quality section still categorical values. So we have to replaced the quality labels with numerical values. The original labels like “awful”, “poor”, “average”, “good”, and “awesome” were mapped to numbers 0 through 4. This is necessary because BERT and most machine learning models expect numerical values for classification tasks.
df1['quality'] = df1['quality'].replace({
    'awful': 0,
    'poor': 1,
    'average': 2,
    'good': 3,
    'awesome': 4
})
Next, we also to check any duplicate rows based on the combination of Id and comment. This is to ensure that we don’t use repeated feedback that could affect the model’s performance.
duplikat_baris = df1[df1.duplicated(subset=['Id', 'comment'], keep=False)]
print(duplikat_baris)
Id      comment  quality
40     45881  No Comments        0
52     45881  No Comments        1
58     45881  No Comments        1
59     45881  No Comments        0
159   601915  No Comments        1
...      ...          ...      ...
2324   64144  No Comments        3
2336   64144  No Comments        3
2341   64144  No Comments        3
2343   64144  No Comments        0
2344   64144  No Comments        0

[75 rows x 3 columns]
Yeah, we see the comment column have a miss value with type “No Comments” so can affect the duplicat row. These rows were irrelevant to the sentiment analysis task, so removing them ensures the dataset only contains valid feedback.
df1 = df1[df1['comment'] != "No Comments"]
And then, we apply to drop the duplicat rows like this.
df1 = df1.drop_duplicates(subset=['Id', 'comment'])
After that, we checking the duplicates after repair
duplikat_baris = df1[df1.duplicated(subset=['Id', 'comment'], keep=False)]
print(duplikat_baris)
Empty DataFrame
Columns: [Id, comment, quality]
Index: []
After cleaning up the dataset the Id column was dropped because it doesn’t provide any useful information for training the model. The comment column contains all the necessary information for the analysis.
df1 = df1.drop(columns=['Id'])
The Model
Okay! Now that the data has been cleaned and prepared, we need to transform it into a format that can be understood by the BERT model. To do this, we use the BertTokenizer to convert the comments into tokens. This tokenizer performs several important steps to prepare the text for BERT:

BERT Preprocessing Steps. Image by Nicolo Cosimo
Each input sentence is split into word-level tokens, and these tokens are mapped to their respective IDs in the BERT vocabulary. Special tokens (add_special_tokens=True) like [CLS] and [SEP] are added automatically to mark the beginning and end of the sentence. These tokens have specific IDs (101 for [CLS], 102 for [SEP]). If the input sentence is shorter than the maximum length (256 tokens in this case), padding tokens ([PAD]) are added to ensure that all inputs have the same length.
To perform these steps, we can use the tokenizer.encode_plus() method, which returns a BatchEncoding object with the following fields:
tokenizer = BertTokenizer.from_pretrained('bert-base-cased')
token = tokenizer.encode_plus(
    df1['comment'].iloc[0],
    max_length=256,
    truncation=True,
    padding='max_length',
    add_special_tokens=True,
    return_tensors='tf'
)
This code will output token IDs, token type IDs, and an attention mask. The input_ids are the IDs of the tokens, while the attention_mask is a binary mask where 1 indicates that the token should be attended to by the model, and 0 indicates a padding token that should be ignored.
token.input_ids
<tf.Tensor: shape=(1, 256), dtype=int32, numpy=
array([[  101, 16731,  1108,   170,  1363,  2564,   117,  1541,   119,
          119,   119,  1119,  1108,   119,  1252,   146,  1464,  1119,
         1125,  1126, 13000,   118, 15550,  1165,  1119,  1286,  1106,
         1301,  1313,  1105,  3654,   119,  1230, 11471,  1105,  1293,
         1119,  3015,  3966,  1117,  1651,  4580,  1108,  2566,  1136,
         4652,   119,  5630,   117,  1632,  2564,  1133,  3644,  1142,
         1705,  1114,  1140,   106,   106,   106,   102,     0,     0,
            0,     0,     0,     0,     0,     0,     0,     0,     0,
            0,     0,     0,     0,     0,     0,     0,     0,     0,
            0,     0,     0,     0,     0,     0,     0,     0,     0,
            0,     0,     0,     0,     0,     0,     0,     0,     0,
            0,     0,     0,     0,     0,     0,     0,     0,     0,
            0,     0,     0,     0,     0,     0,     0,     0,     0,
            0,     0,     0,     0,     0,     0,     0,     0,     0,
            0,     0,     0,     0,     0,     0,     0,     0,     0,
            0,     0,     0,     0,     0,     0,     0,     0,     0,
            0,     0,     0,     0,     0,     0,     0,     0,     0,
            0,     0,     0,     0,     0,     0,     0,     0,     0,
            0,     0,     0,     0,     0,     0,     0,     0,     0,
            0,     0,     0,     0,     0,     0,     0,     0,     0,
            0,     0,     0,     0,     0,     0,     0,     0,     0,
            0,     0,     0,     0,     0,     0,     0,     0,     0,
            0,     0,     0,     0,     0,     0,     0,     0,     0,
            0,     0,     0,     0,     0,     0,     0,     0,     0,
            0,     0,     0,     0,     0,     0,     0,     0,     0,
            0,     0,     0,     0,     0,     0,     0,     0,     0,
            0,     0,     0,     0,     0,     0,     0,     0,     0,
            0,     0,     0,     0,     0,     0,     0,     0,     0,
            0,     0,     0,     0]], dtype=int32)>
Now, we are going to create zero arrays for input IDs and attention masks.
The number of rows will be the same as the number of samples in the dataset,
which is the length of df1. Each row will have 256 columns, which is the maximum
sentence length. Both input IDs and attention masks will have the same dimensions.
X_input_ids = np.zeros((len(df1), 256))
X_attn_masks = np.zeros((len(df1), 256))
The next step is to generate the training data. We will fill the input IDs and
attention masks arrays that we created earlier. To do this, we use a function called
generate_training_data. This function takes a data frame, the input IDs array, the a
ttention masks array, and a tokenizer as inputs.
def generate_training_data(df, ids, masks, tokenizer):
    for i, text in tqdm(enumerate(df1['comment'])):
        tokenized_text = tokenizer.encode_plus(
            text,
            max_length=256,
            truncation=True,
            padding='max_length',
            add_special_tokens=True,
            return_tensors='tf'
        )
        ids[i, :] = tokenized_text.input_ids
        masks[i, :] = tokenized_text.attention_mask
    return ids, masks
First, we loop through the comments in the data frame.
For each comment, we tokenize it using tokenizer.encode_plus
with the same parameters as before. After tokenizing, we fill
the corresponding row in the input IDs array and the attention
masks array. This process is repeated for every row in the data frame.
Finally, the function returns the completed input IDs and attention masks arrays.
Now, we also need to define the labels array. The dimensions will match with the dataset before,
with the shape being (number of samples, number of classes). Since we have 5 classes, the shape will be (len(df1), 5).
labels = np.zeros((len(df1), 5))
labels.shape
(2273, 5)
The labels array will be used as a one-hot encoded target vector. In one-hot encoding, each class is represented as a vector with all zeros except for the index corresponding to the class, which will be 1.
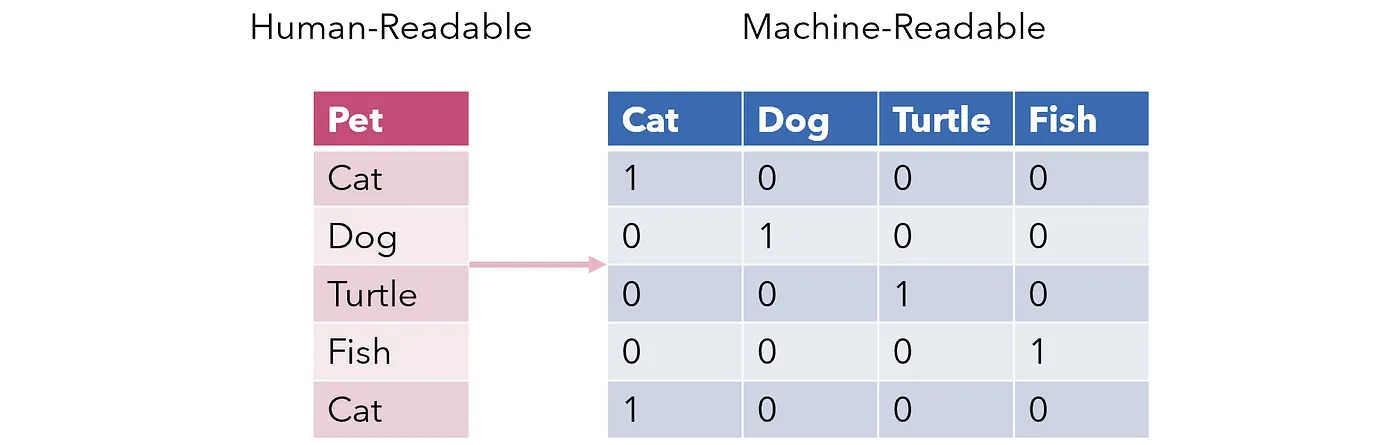
Example of One-Hot Encoding. Image by Andre Ye
Now, we will populate the labels array with one-hot encoded vectors using the following code:
labels[np.arange(len(df1)), df1['quality'].values] = 1 # one-hot encoded target tensor
labels
array([[1., 0., 0., 0., 0.],
       [0., 1., 0., 0., 0.],
       [1., 0., 0., 0., 0.],
       ...,
       [0., 0., 1., 0., 0.],
       [0., 0., 1., 0., 0.],
       [0., 0., 1., 0., 0.]])
For every sample, the one-hot encoded vector will have 5 positions, corresponding to the 5 classes. For example, if the class is 2, the third column will be 1, and the rest will be 0.
The next step is to create the dataset using TensorFlow’s tf.data utility.
This step helps us to build a precise and efficient dataset pipeline. By using the
from_tensor_slices function, we can combine input IDs, attention masks, and labels
into a dataset object. This object will allow us to iterate through the data and create
batches, which simplifies the training process.
dataset = tf.data.Dataset.from_tensor_slices((X_input_ids, X_attn_masks, labels))
Let’s inspect the shape of one example from this dataset. Each example contains:
- Input IDs – the tokenized representation of the sentence (256 tokens).
- Attention Masks – which tokens are actual input vs padding (256 tokens).
- Labels – the one-hot encoded class labels (5 classes).
dataset.take(1) # Inspect one sample
<_TakeDataset element_spec=(
  TensorSpec(shape=(256,), dtype=tf.float64, name=None),
  TensorSpec(shape=(256,), dtype=tf.float64, name=None),
  TensorSpec(shape=(5,), dtype=tf.float64, name=None)
)>
This output confirms that each sample has 256 tokens for both input IDs and attention masks, and a label vector of size 5. The dataset is now ready to be used for batching during training.
Next, we need to create a mapping function that formats the dataset for batching. The tf.data dataset expects the map function to return data in the correct structure. I have already defined the mapping function, and here, we are modifying how the function outputs the data. This ensures the dataset will return input IDs, attention masks, and labels in the required format during training.
def SentimentDatasetMapFunction(input_ids, attn_masks, labels):
    return {
        'input_ids': input_ids,
        'attention_mask': attn_masks
    }, labels
After defining the function, we apply it to the dataset using the map() method. This step reformats the data to include keys like input_ids and attention_mask.
dataset = dataset.map(SentimentDatasetMapFunction) # converting to required format for tensorflow dataset
Let’s check the structure of one example in the dataset after applying the map function. Now, the dataset will return both the keys (input_ids and attention_mask) and the labels.
dataset.take(1)
<_TakeDataset element_spec=(
  {'input_ids': TensorSpec(shape=(256,), dtype=tf.float64, name=None),
   'attention_mask': TensorSpec(shape=(256,), dtype=tf.float64, name=None)},
  TensorSpec(shape=(5,), dtype=tf.float64, name=None)
)>
The next step is to shuffle the dataset and define the batch size. We use the shuffle() function to randomize the data, ensuring the training process is not biased. The batch size is set to 16, and we use drop_remainder=True to remove any leftover samples that don’t fit evenly into the batch size. For example, if there are 33 samples and the batch size is 16, one sample will remain. drop_remainder ensures this extra sample is excluded.
dataset = dataset.shuffle(10000).batch(16, drop_remainder=True) # Batch size, drop any leftover tensors
Now, we split the dataset into training and validation sets. We allocate 80% of the dataset for training and the remaining 20% for validation. The training size is calculated as 80% of the total dataset size divided by the batch size.
p = 0.8
train_size = int((len(df1) // 16) * p)  # Calculate training size (80% of total batches)
train_size
# Output:
# 113
Using this training size, we split the dataset. The first 113 batches are used for training, and the rest are used for validation.
train_dataset = dataset.take(train_size)  # First 80% for training
val_dataset = dataset.skip(train_size)   # Remaining 20% for validation
Next, we will prepare our BERT-based model for sentiment analysis.
We use the TFBertModel from the Transformers library, loading the pre-trained model "bert-base-cased".
from transformers import TFBertModel
model = TFBertModel.from_pretrained('bert-base-cased')  # Load BERT model with pre-trained weights
Our model will take two inputs: input_ids and attention_mask. Each input has a fixed shape of 256, representing the tokenized sequences.
# Define two input layers for input_ids and attention_mask
input_ids = tf.keras.layers.Input(shape=(256,), name='input_ids', dtype='int32')
attn_masks = tf.keras.layers.Input(shape=(256,), name='attention_mask', dtype='int32')
Using the pre-trained BERT model, we extract the pooled embeddings from its second output ([1]). This layer provides dense vectors summarizing the input sequences.
# Extract pooled embeddings from BERT
bert_embds = model.bert(input_ids, attention_mask=attn_masks)[1]  # [1] -> pooled output
Next, we add an intermediate dense layer with 512 units and ReLU activation. This layer further processes the embeddings to capture meaningful patterns.
# Add an intermediate dense layer
intermediate_layer = tf.keras.layers.Dense(512, activation='relu', name='intermediate_layer')(bert_embds)
Finally, the output layer has 5 units, one for each class, with a softmax activation function to compute class probabilities.
# Add output layer for classification
output_layer = tf.keras.layers.Dense(5, activation='softmax', name='output_layer')(intermediate_layer)
We combine these layers into a complete model. The inputs are input_ids and attention_mask, and the output is the classification result.
# Create the complete model
sentiment_model = tf.keras.Model(inputs=[input_ids, attn_masks], outputs=output_layer)
sentiment_model.summary()
This summary shows the model structure, including the trainable parameters:
Model: "model"
__________________________________________________________________________________________________
 Layer (type)                Output Shape                 Param #   Connected to
==================================================================================================
 input_ids (InputLayer)      [(None, 256)]                0         []

 attention_mask (InputLayer  [(None, 256)]                0         []
 )

 bert (TFBertMainLayer)      TFBaseModelOutputWithPooli   1083102   ['input_ids[0][0]',
                             ngAndCrossAttentions(last_   72         'attention_mask[0][0]']
                             hidden_state=(None, 256, 7
                             68),
                              pooler_output=(None, 768)
                             , past_key_values=None, hi
                             dden_states=None, attentio
                             ns=None, cross_attentions=
                             None)

 intermediate_layer (Dense)  (None, 512)                  393728    ['bert[0][1]']

 output_layer (Dense)        (None, 5)                    2565      ['intermediate_layer[0][0]']

==================================================================================================
Total params: 108706565 (414.68 MB)
Trainable params: 108706565 (414.68 MB)
Non-trainable params: 0 (0.00 Byte)
__________________________________________________________________________________________________
And this looks like for the diagram model:
Diagram Model Sentiment Feedback. Image by Author
The next step is to define the loss function, metrics, and optimizer. Since this is a multi-class classification problem, we use CategoricalCrossentropy as the loss function and CategoricalAccuracy for measuring accuracy. For optimization, we use the Adam optimizer with a learning rate schedule.
# Define learning rate decay using ExponentialDecay
learning_rate_schedule = tf.keras.optimizers.schedules.ExponentialDecay(
    initial_learning_rate=1e-5,
    decay_steps=100000,
    decay_rate=0.96,
    staircase=True
)

# Adam optimizer with learning rate schedule
optim = tf.keras.optimizers.Adam(learning_rate=learning_rate_schedule)

# Loss function and metrics
loss_func = tf.keras.losses.CategoricalCrossentropy()
acc = tf.keras.metrics.CategoricalAccuracy('accuracy')
We compile the model using the optimizer, loss function, and accuracy metric defined earlier.
# Compile the model
sentiment_model.compile(optimizer=optim, loss=loss_func, metrics=[acc])
Now the model is ready for training. We use the fit() method to train the model on our training dataset and validate it using the validation dataset. Here, we train the model for 15 epochs.
# Train the model
hist = sentiment_model.fit(
    train_dataset,
    validation_data=val_dataset,
    epochs=15
)
Below is the accuracy and loss for the first 5 epochs with each epoch increasing. You can see how the model improves over time.
Epoch 1/5
113/113 [==============================] - 1194s 10s/step - loss: 1.3960 - accuracy: 0.3833 - val_loss: 1.1115 - val_accuracy: 0.4677
Epoch 5/5
113/113 [==============================] - 1173s 10s/step - loss: 0.7226 - accuracy: 0.7030 - val_loss: 0.5544 - val_accuracy: 0.8103
After training for 15 epochs, the accuracy and loss improve significantly.
Epoch 15/15
113/113 [==============================] - 1205s 11s/step - loss: 0.1097 - accuracy: 0.9674 - val_loss: 0.0494 - val_accuracy: 0.9806
Finally, we evaluate the model’s performance on the validation dataset to check its accuracy and loss. The model will take around four hours on GPU to complete training and achieves excellent results on the validation dataset with high accuracy as we expected.
# Evaluate on validation dataset
loss, accuracy = sentiment_model.evaluate(val_dataset)
print(f"Validation Loss: {loss}")
print(f"Validation Accuracy: {accuracy}")
Validation Loss: 0.0571
Validation Accuracy: 0.9871
And this looks like for the plot accuracy and loss:

Plot Accuracy and Loss. Image by Author
For the final part, don’t forget to save the model after trained. This allows you to load the model later for testing on unseen data or further use in other tasks. Below is the code to save the trained model.
sentiment_model.save("model_aft15_epoch/bert_sentiment_model")
To use the saved model, you can load it directly and prepare the tokenizer to process input data for testing on random sample.
To make predictions with the model, you first need to preprocess the input text. The prepare_data() function tokenizes the input and ensures it is in the correct format for the model.
# Initialize tokenizer
tokenizer = BertTokenizer.from_pretrained('bert-base-cased')

# Prepare data for prediction
def prepare_data(input_text, tokenizer):
    token = tokenizer.encode_plus(
        input_text,
        max_length=256,
        truncation=True,
        padding='max_length',
        add_special_tokens=True,
        return_tensors='tf'
    )
    return {
        'input_ids': tf.cast(token.input_ids, tf.float64),
        'attention_mask': tf.cast(token.attention_mask, tf.float64)
    }
Next, we define the make_prediction() function to classify the input text into one of the predefined sentiment classes. This function uses the trained model to predict the sentiment of the processed data.
# Make predictions
def make_prediction(model, processed_data, classes=['Awful', 'Poor', 'Neutral', 'Good', 'Awesome']):
    probs = model.predict(processed_data)[0]
    return classes[np.argmax(probs)]
Here is an example of predicting the sentiment for a given input text. The text is processed using the tokenizer, and the model predicts the sentiment class.
# Example: Predict sentiment of a text
input_text = 'A lot of speaking without any sense. Skip it at all cost'
processed_data = prepare_data(input_text, tokenizer)
result = make_prediction(sentiment_model, processed_data=processed_data)
print(f"Predicted Sentiment: {result}")
The output will show the sentiment prediction for the given input text.
1/1 [==============================] - 0s 364ms/step
Predicted Sentiment: Awful
AI Analyzer
After completing the sentiment feedback feature, we enhanced our application with the AI Analyzer. This feature uses the Gemini API to process feedback categorized by the sentiment analysis model and generate actionable insights and recommendations.
Set Up the Environment
It is a good practice to create a virtual environment before working on a Python project. This helps isolate dependencies between projects. Use the following commands:
python3 -m venv .venv
source .venv/bin/activate
Next, install the Python SDK for the Gemini API, which is available via the google-generativeai package.
pip install -q -U google-generativeai
Obtain an API Key
To access the Gemini API, we’ll need an API key. Sign up at Google AI Studio by Google to get a free Gemini API key. For this case we used Gemini Flash 1.5 API.
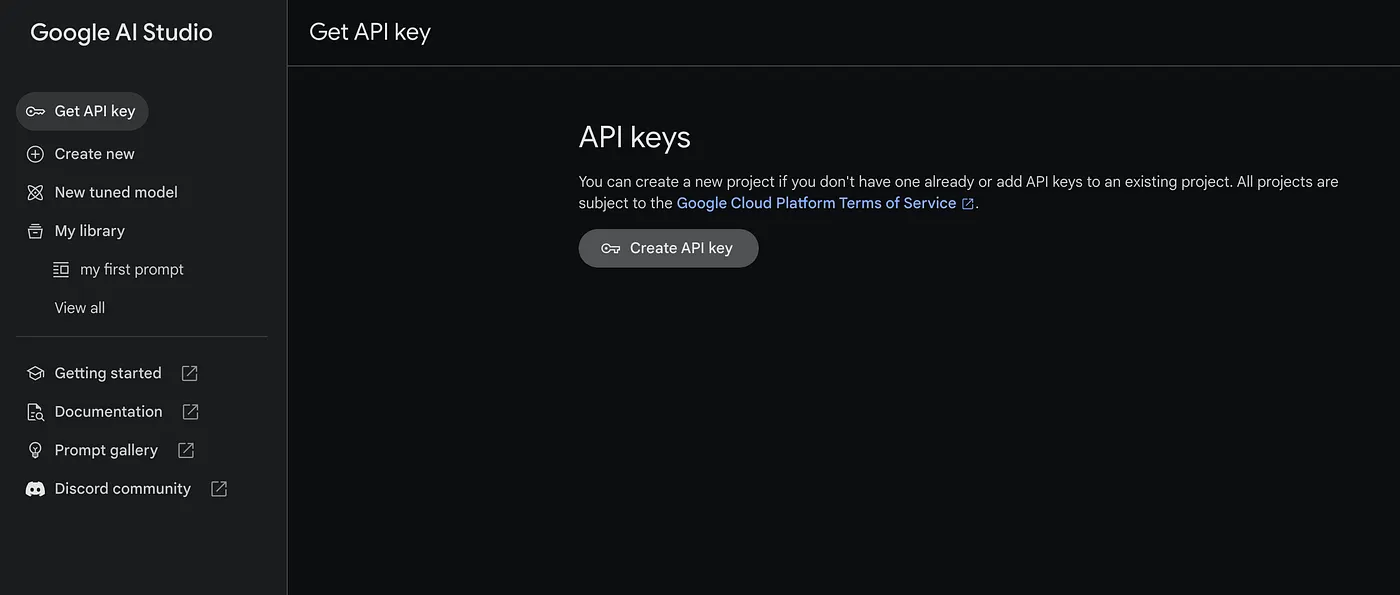
Google AI Studio. Image by Roaming Roadster
GOOGLE_API_KEY=<YOUR_KEY>
Architecture Flow for AI Student Analyzer
The diagram below illustrates the architecture for the AI Student Analyzer, which uses LLM (Gemini API) to process categorized feedback, generate insights, and provide recommendations:
AI Student Feedback Analyzer Flow. Image by Author
The feedback is categorized into two files based on the sentiment analysis results:
- Negative Feedback: Contains feedback labeled as “poor” or “awful.”
- ositive Feedback: Contains feedback labeled as “good” or “awesome.”
Below are the files where categorized feedback is stored:
negative_feedback_file = "negative_feedback.json"
positive_feedback_file = "positive_feedback.json"
Here is an example of how the feedback data might look in JSON format:
negative_feedback.json:
{
    "feedback": [
      {
        "id": 1,
        "text": "Rand was a good guy, really... he was. But I felt he had an alter-ego when he left to go home and grade. His expectations and how he picked apart his students papers was simply not fair. Again, great guy but avoid this class with him!!",
        "sentiment": "awful"
      },
      {
        "id": 2,
        "text": "He is brilliant in his field, but expects his students to perform at high levels, with unrealistic expectations. Only by a miracle did I get an A, and that was after a heavy curve. He does care about his students though, as he gives lots of time in class for work, while he goes around giving tips and answering questions.",
        "sentiment": "poor"
      },
      {
        "id": 3,
        "text": "He has a major in philosophy which is why all the papers you have to write are based on philosophy. As long as your paper agrees with what he thinks you will get a good grade. Otherwise the class is boring and he talks for an hour about nonsense but it is mandatory to attend otherwise your grade will drop.",
        "sentiment": "awful"
      },
      {
        "id": 4,
        "text": "I recently just finished taking Comp 110 with Rand and it was the hardest class of my freshman semester. He takes it way too serious for a 100 level class. 80% of the class is papers so you would think you control the grade you get, right? Wrong. He will tear apart your paper and give you a bad grade despite your efforts. I worked hard for a C.",
        "sentiment": "poor"
      },
      {
        "id": 5,
        "text": "He graded a 100 level class like we were all English majors in a 300 or above level class. Never got higher than a C on a paper. I went to the writing center for every paper. Very unclear in instructions and hard to approach with questions. Don't take the class from him.",
        "sentiment": "awful"
      },
      {
        "id": 6,
        "text": "Tough grader on papers make sure you do your work and drafts. Participation grades save you in the long run. Dont miss class and do your work. Go to the tutor center helps alot, poor.",
        "sentiment": "poor"
      },
      {
        "id": 7,
        "text": "Do not take English 110 with Rand. I don't feel any better at writing due to his confusing grading style.",
        "sentiment": "poor"
      }
    ]
  }
positive_feedback.json:
{
    "feedback": [
      {
        "id": 1,
        "text": "I thought his class was extremely hard but despite it all, I became a confident writer. People on here say 'you can only get a c on a paper' WRONG. I got an A and a B. You just have to be in it to win it. If you want to get an A, get a different teacher. If you want learn, Go for Rand. He made Eng. 110 worth something.",
        "sentiment": "good"
      },
      {
        "id": 2,
        "text": "Steven Rand is a nice person and really interesting to hear him speak. I am always inspired after a lecture. However, never expect to get anything higher than a C. You can think your paper is perfect but, he will tear it apart in seconds. Take a different professor if you don't want to put 9 hours of work into a paper you get an 'average' grade on.",
        "sentiment": "good"
      }
    ]
}
Building the AI Analyzer
To develop the AI Analyzer, the Gemini API is configured to process categorized
feedback and provide tailored insights and recommendations for lecturers. So, the system instruction for the Gemini API here
have to be like AI Analyzer to give an output by reading the negative_feedback.json and positive_feedback.json to analyze it.
Below is the system instruction I created to configure the AI Analyzer for analyzing feedback:
model = genai.GenerativeModel(
    model_name="gemini-1.5-flash",
    generation_config=generation_config,
    system_instruction = """
      You are an AI Student Feedback Analyzer designed to assist lecturers by analyzing categorized
      student feedback and providing actionable insights and recommendations in a concise format.
      Your tasks are:

      1. **Insights Generation**:
          - Analyze feedback data categorized into two files: *negative feedback* (poor, awful) and
      *positive feedback* (awesome, good).
          - If there is content in the *negative feedback* file:
              - Identify the most important issue or recurring need expressed by students.
              - Summarize the main problem or need in 1-2 sentences.
          - If there is no content in the *negative feedback* file:
              - Focus on insights from the *positive feedback* file.
              - Highlight in 1-2 sentences what students appreciated the most and suggest maintaining
      or enhancing these strengths.

      2. **Recommendation Generation**:
          - If *negative feedback* exists:
              - Provide a specific and actionable improvement recommendation in 1-2 sentences based
      on the issue identified.
              - Incorporate positive aspects from the *positive feedback* file, if applicable, to
      balance the recommendation.
          - If there is no *negative feedback*:
              - Provide a recommendation in 1-2 sentences that emphasizes sustaining and enhancing
      the strengths highlighted in the positive feedback file.

      3. **Tone and Style**:
          - Maintain a professional yet empathetic tone.
          - Use simple grammar and clear language that reflects the voice of students, making the
      feedback relatable and impactful for the lecturer.
          - Avoid overly technical or lengthy responses; focus on practical, concise, and actionable
      advice.

      4. **Output Structure**:
          - Provide the output as a single paragraph with the following structure:
              - **Insights**: 1-2 sentences summarizing the key issue or strength.
              - **Recommendation**: 1-2 sentences outlining specific and actionable steps to address
      the issue or sustain the strength.

      Your analysis should be driven by the data provided in the feedback files and enriched by your
      global knowledge. Ensure the output feels authentic to the student's perspective and directly
      helps the lecturer improve their teaching.
      """
)
Once the feedback files are ready, the data is read and passed to the AI model for analysis.
# Read categorized feedback
with open(negative_feedback_file, "r") as neg_file:
    negative_feedback = json.load(neg_file)

with open(positive_feedback_file, "r") as pos_file:
    positive_feedback = json.load(pos_file)

# Generate insights and recommendations
response = model.generate_content(f"Negative Feedback:\n{negative_feedback}\n\nPositive Feedback:\n{positive_feedback}")
print(response)
Here’s an example of what the AI Analyzer produce by read the negative_feedback.json and positive_feedback.json before:
Insights: Students consistently reported that Professor Rand's grading rubric was unclear, leading to unexpectedly low grades despite significant effort.  While appreciating his helpful in-class support and engaging lectures, many felt his high expectations and philosophy-focused grading were overly rigorous for a 100-level course, resulting in frustration and a sense of unfairness.

Recommendation: To address student concerns, Professor Rand should provide more explicit and detailed grading criteria for papers, perhaps including examples of high-quality work.  While maintaining high academic standards, he could consider adjusting the rigor of assignments to better align with a 100-level course, perhaps offering more scaffolding or opportunities for revision, thereby making the learning process less stressful.  This would allow him to maintain the enthusiasm for the subject he clearly possesses and benefit his students who work hard.
This feature enhances our app by helping lecturers understand their students needs and take actionable steps to improve their teaching. It’s cool right? So, our feature in machine learning already done and go to the next step to develop the ui app mobile code.
Development
As you already know, the goal of this project is to create a mobile application with AI/ML features. Typically, we might use Kotlin for native Android development or Dart with Flutter for cross-platform development. But here’s the cool part: this project is fully built in Python using a framework called Flet.
What is Flet?
Flet is a framework that lets us build cross-platform apps running on web, desktop, and mobile, without needing prior knowledge of front-end development. Unlike other frameworks that are just libraries for existing platforms, Flet is built from scratch. It uses Flutter underneath to create sleek and professional UIs.
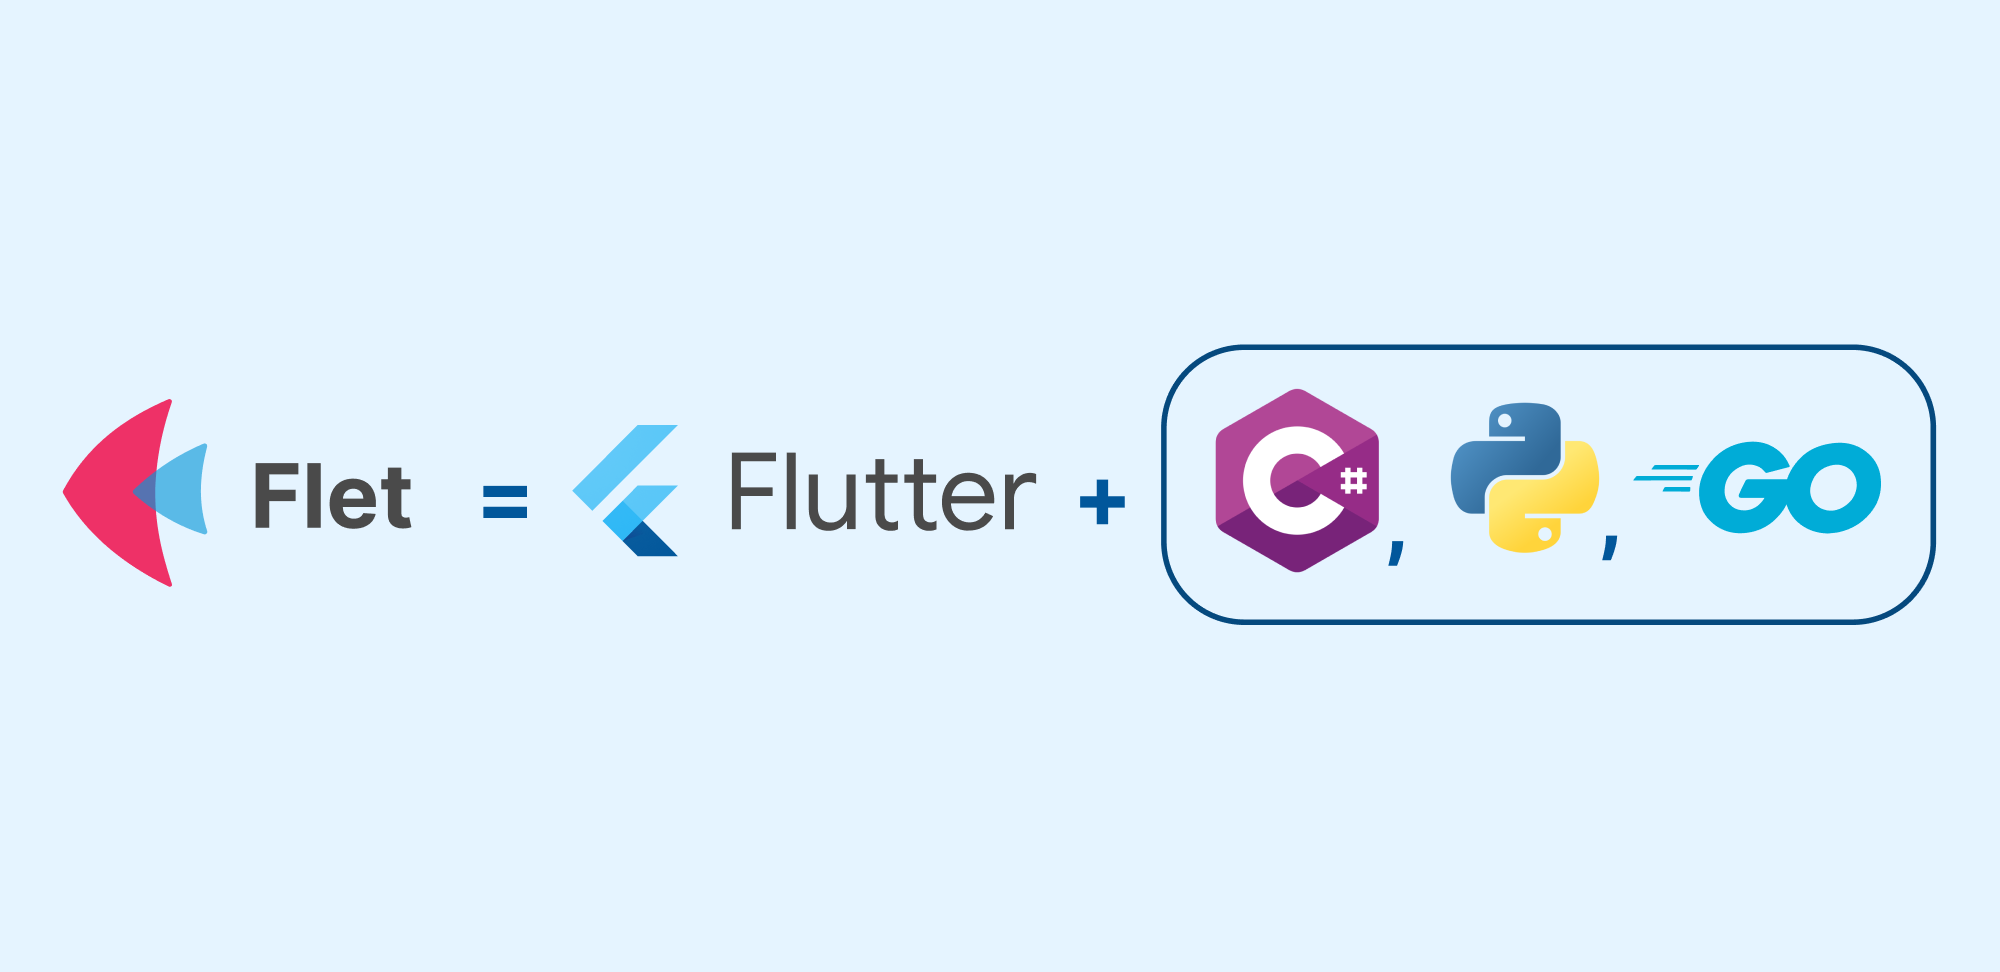
This is How The Flet Looks Like. Image by Muqaddir
Flet’s Features
- Powered by Flutter.
- Quickly build apps within minutes.
- Simple architecture.
- Supports Python and, in the future, other languages like Go, C#, etc.
Flet Architecture
Every Flet app is essentially a web app. Even when opened in a native OS window, it uses a built-in web server called fletd (written in Go). This server handles storing the app’s current state, updating the UI, and acting as a middle-end between the Python code and Flutter client. Despite the complexity, Flet makes development straightforward.
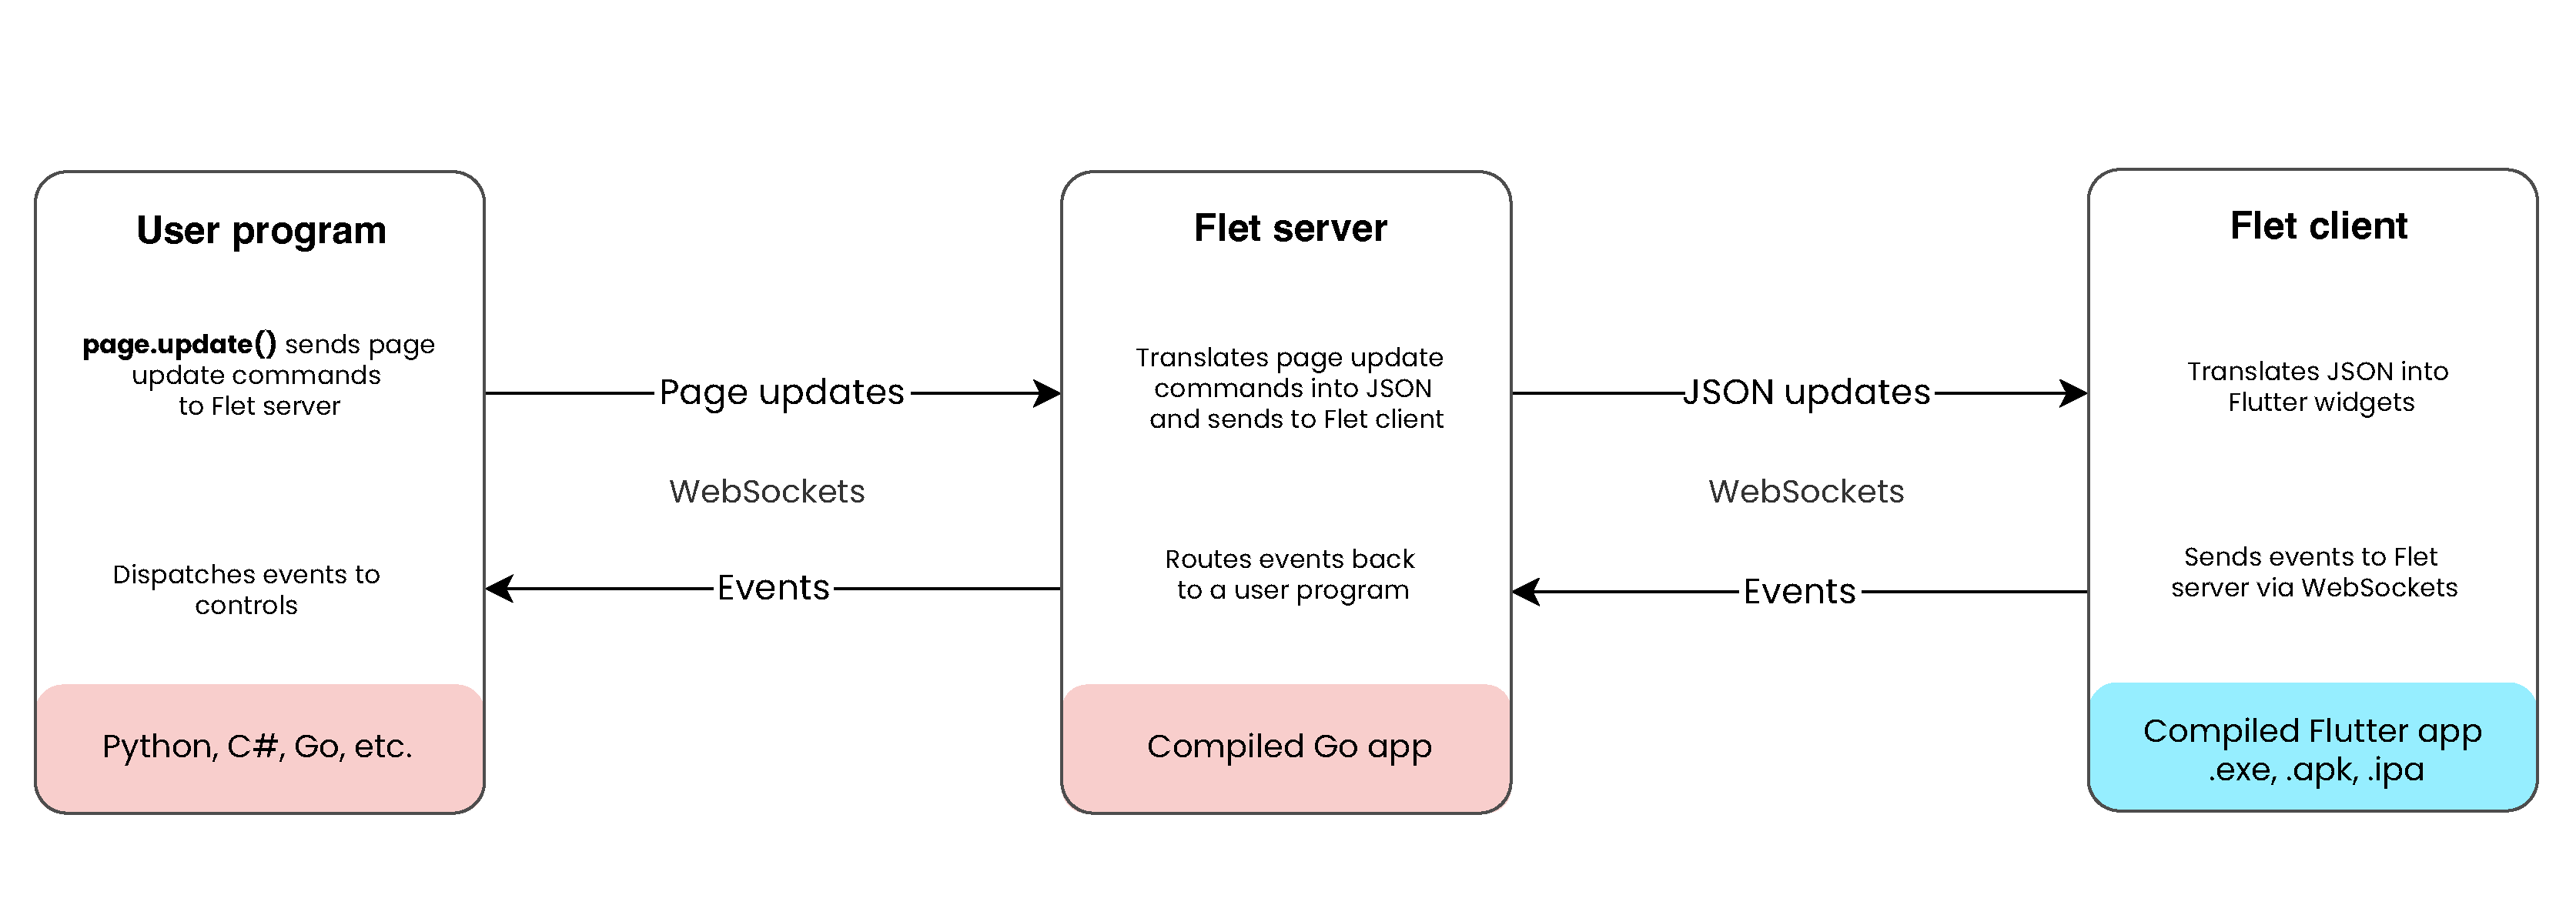
The Architecture of a Flet App. Image by Muqaddir
Creating the App
To start with Flet, we just need a basic Python environment, an IDE, and some familiarity with Flutter Widgets. Install Flet using one of the following commands:
pip install flet
# or
pip3 install flet
In this project, I’ve already created the design, so the focus is purely on coding. In this blog, I will only show you several code snippets because including all the front-end and back-end code would make this blog too long. Let’s look at the key parts!
from flet import *
import flet
import time
import math
import json
from sentiment import predict_sentiment
from chatbot import generate_chatbot_response
The above code imports Flet and other necessary modules. It also includes two custom modules like
predict_sentiment (for Sentiment Analysis) and generate_chatbot_response (for AI Student Analyzer responses).
So, next i will visualizing sentiment feedback, I created a pie chart widget. It displays the proportions of different sentiment categories (e.g., awful, good, awesome).
def create_pie():
    sentiments = [awful, poor, neutral, good, awesome]
    labels = ["Awful", "Poor", "Neutral", "Good", "Awesome"]

    sentiment = get_labels_with_threshold(sentiments, labels, threshold_percentage=0.1)
    return sentiment
And then, I added a bottom sheet to gather user feedback. This sheet contains a form where users can share their thoughts. Here’s how it looks in the code:
def create_bottom_sheet(page: Page):
    return BottomSheet(
        Container(
            Column(
                [
                    Row(
                        alignment=MainAxisAlignment.SPACE_BETWEEN,
                        controls=[
                            Text(
                                value="What can we improve?",
                                size=20,
                                weight="bold",
                                color="black",
                            ),
                            IconButton(
                                icon=Icons.CLOSE,
                                icon_size=20,
                                on_click=close_bs,
                            )
                        ],
                    ),
                    Text(
                        value="We value your feedback about this class! Share your thoughts so we can enhance the learning experience.",
                        size=16,
                        color="#52525B",
                        text_align=TextAlign.LEFT,
                    ),
                    feedback_input,
                    Container(
                        ElevatedButton(
                            text="Submit",
                            bgcolor="#6366F1",
                            width=330,
                            color="white",
                            on_click=lambda e: submit_feedback(e, page),
                        ),
                        alignment=alignment.center,
                        margin=margin.only(top=38),
                    ),
                ],
                tight=True,
            ),
            padding=padding.only(15, 15, 15, 30),
            bgcolor="white",
            border_radius=border_radius.only(top_left=20, top_right=20),
            expand=True,
            height=402,
        ),
        on_dismiss=bs_dismissed,
    )
To showcase the AI Analyzer results, I created a container that mimics a chatbot response. It also includes typing delays for a natural feel:
def display_result(page: Page, response_text: str):
    ct_result.content.controls.clear()
    page.update()

    result_container = Row(
        controls=[
            Column(
                controls=[
                    Image(src="icons/gemini.gif", width=20, height=20),
                ],
                alignment="start",
                spacing=10,
            ),
            Column(
                controls=[
                    Text(value="", color="#5563FA", size=12, expand=True),
                ],
                expand=True,
            ),
        ],
        alignment="start",
        vertical_alignment="start",
        spacing=5,
    )

    ct_result.content.controls.append(result_container)
    page.update()

    result_text = result_container.controls[1].controls[0]
    typing_delay = 0.02

    for char in response_text:
        result_text.value += char
        page.update()
        time.sleep(typing_delay)
The final step is to add all the widgets to the main page. This is done in the manage() function
def manage(page: Page):
    global bs

    page.window.max_width = 390
    page.window.width = 390
    page.window.max_height = 670
    page.window.height = 670

    page.padding = 0
    page.font = {
        "font_name":"fonts/PlusJakartaSans.ttf"
    }
    page.theme = Theme(font_family = "font_name")

    bs = create_bottom_sheet(page)
    page.overlay.append(bs)

    page.add(
        main_body
    )

    initial_response_text = generate_chatbot_response()
    display_result(page, initial_response_text)

flet.app(target=manage, view=AppView.WEB_BROWSER, assets_dir="assets", port=5555)
To run the app, simply type the following command in your terminal:
python filename.py
Below is what the UI looks like
The loading is a bit slow because it’s running on my local computer using the CPU.
Isn’t it cool? The app is fully functional and built entirely in Python using Flet. Currently, Flet is still in early development (version 1.0). If you’re curious about its roadmap, check it here.
You can also try creating other apps like To-Do lists, calculators, Trello clones, and more! Click here to explore Flet tutorials.
Future Directions
So, finally, our app is created with AI features inside. But our journey doesn’t stop here—there’s still a long way to go to complete everything. Some features I plan to develop in the future include creating an AI Examination. This will allow the entire process of student exams, from questions to results, to be managed and monetized through an AI Agent Exam. Also, a course recommendation feature is something I need to build soon.
If you’re interested, we can contribute together! Feel free to open issue or pull request at the GitHub link below. Stay tuned for the next series of updates to our app!
Watch this repo